
Creating a winning advertising campaign doesn’t need to be rocket science. A wealth of new tools in ad tech has made online advertising and campaign creation more effortless than ever. Let’s take a spin around the Adcash Advertiser Platform
Forget digital marketing degrees, coding academies, design skills, and hefty budgets. All you need to get started is a niche, an offer, an ideal audience, and the right online advertising platform.
Stick around as we unpack everything you need to know to get yourself set up on the Adcash Advertiser Platform, including the steps below:
- Registering your account & adding funds
- Mastering your advertising campaign setup
- Selecting the best targeting options
- Excluding unprofitable zones & traffic sources
- Loading your creatives using a variety of top ad formats
- Adjusting your Bid/Budget Settings
Whether you’re a product owner looking to skyrocket your sales, an affiliate/media buyer looking to boost your conversions on a range of leading products & services, or an advertising platform on the lookout for new traffic sources, you can start running ads and generating revenue right away with the Adcash Advertising Platform!
Why Should I Join An Advertising Platform?
While Facebook and Google will continue to hold a large portion of the global online advertising market for years to come, there is ample space for leading online advertising platforms to make their mark and carve a vital niche in a $208 billion industry.
The two giants dominate the white-label, mainstream online advertising space, but come with strict policies that limit certain types of content and verticals. Adcash fills this gap by providing advertisers with access to both mainstream and adult vertical traffic
Indeed, siding with the right advertising campaign platform gives you full access to cutting-edge optimization technology, anti-fraud protocols, and a list of leading websites to place your ads. Furthermore, Adcash’s platform can remain agile and avoid bureaucratic red tape while bringing in 200 million unique users daily
Here are some of the benefits of siding with our trusted advertising platform:
Reach Global Audiences
Advertisers can unify their media buying efforts and access an exclusive network of top-tier websites and 200+ supply partners
Save Time with Smart Bidding
Smart bidding technology optimizes campaign traffic and performance while eliminating unnecessary manual work
Advanced Anti-Ad Fraud Protocols
Protect your online advertising campaign from fraudulent engagement and bot traffic
Fast & Effective Campaign Creation
Set up your campaign and start running global ads in the shortest possible time.
Multiple Online Ad Formats
Drive high-quality leads and generate conversions with multiple engaging ad formats
Advanced Targeting Technology
Tailor your ads to the right audience with various targeting options.
Real-Time Tracking & Reporting
Monitor your campaign performance and make data-driven decisions on the go
Adcash Advertiser Platform: Guide to Getting Started
Below are the steps to start running campaigns on the Adcash Advertiser platform. Once your account has been registered and approved, you’ll be able to get started immediately.
Keep reading as we cover the step-by-step essentials to starting your first ad campaign rollout, from selecting the right targeting options and adding funds to uploading your creatives and tracking your conversions.
Step 1: Register Your Account
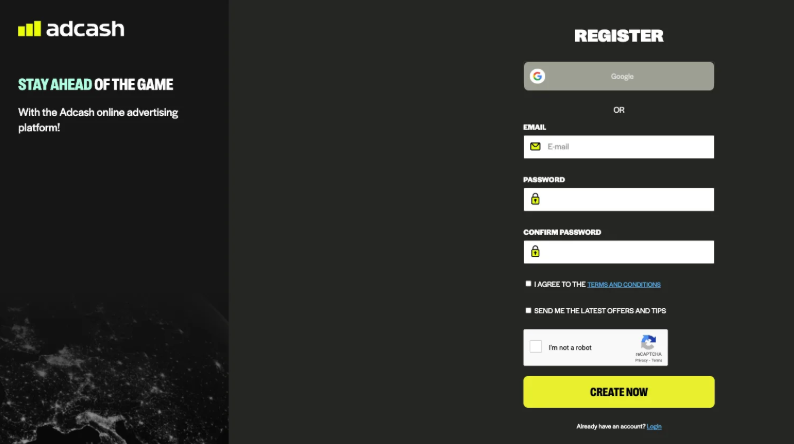
First things first, you’ll need to set up your Advertiser Account
You’ll receive an email asking you to confirm your email address; from there, you can go ahead and get started. Remember that our compliance team will review your upcoming advertising campaign and approve it if it meets our platform criteria
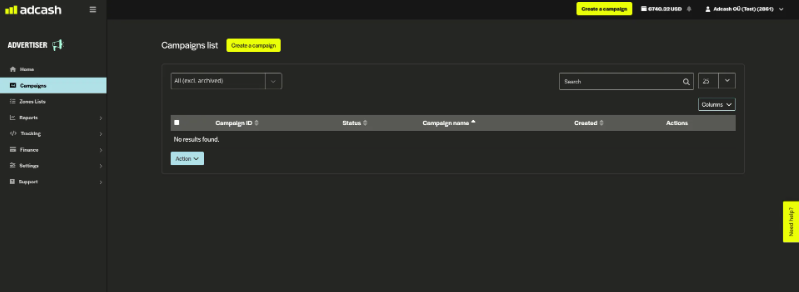
Step 2: Create Your First Campaign
Here are the steps to create your first campaign on the Adcash Advertiser platform
After the registration process, you’ll need to get your advertising campaign up and running. Click on the option to “Create a Campaign,” which will redirect you to the campaign setup page
You’ll start by entering the name of your campaign so you can locate it at a later stage. If you’re planning on running multiple campaigns simultaneously, it’s helpful to add the name of the offer, the country, and the operating system
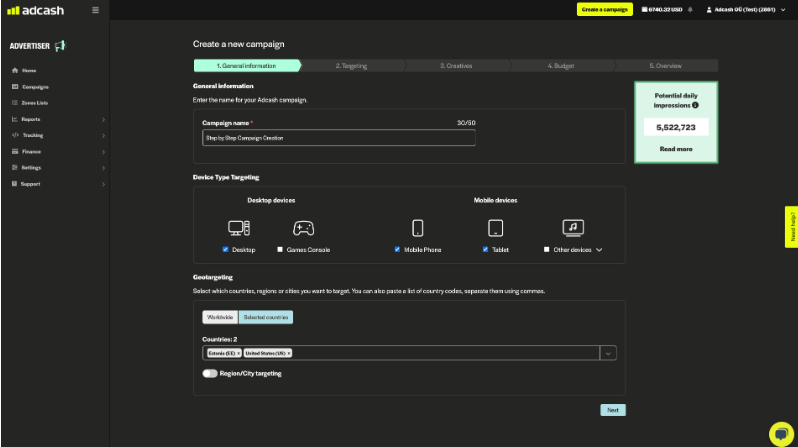
Device Type Targeting
From here, you’ll need to select your device type targeting. Here, we’ve picked desktop, mobile, and tablet, but depending on your campaign requirements, you’ll also have the option to target console or other device types
Geo-Targeting
We’re targeting our campaign in Estonia and the United States. However, depending on your setup/targeting criteria, you can select any country you like or opt to go worldwide. You also have the opportunity to target specific regions of a country
Potential Daily Impressions
Take note of the green inventory forecast widget at the top right-hand side of the panel. This indicates how much reach your campaign will have. The more narrow the targeting gets, the less traffic you’ll be exposed to, so be aware of this and try to find a good balance.
The widget itself is dynamic and will help you along the way by changing color according to your targeting.
- Green – Broad Targeting
- Orange – Defined Targeting
- Red – Narrow Targeting
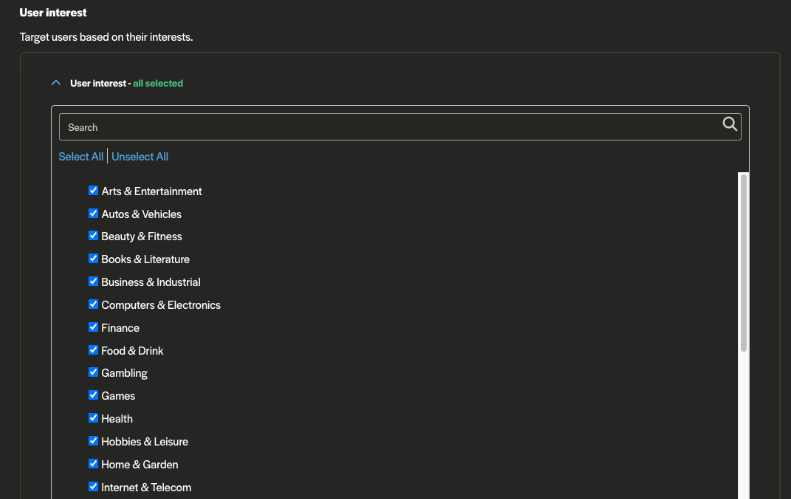
Step 3: User Interest & Website Category Targeting
At this stage in your campaign creation process, you’ll have the option to target according to user interest or website categories. You won’t be able to use both at the same time. Remember that you don’t have to use the abovementioned targeting parameters for every campaign. If you’re running a CPM offer, you might find them beneficial; however, if you’re structuring your campaign around another payout model, you might not need to go so narrow.
User Interest Targeting
Here you can target users based on their browsing preferences. This will allow your campaigns to reach users (already segmented by Adcash) according to their interests. For example, if you select sports as your targeting category, ads will not only be shown to traffic currently on a sports-related website but will also display for users who have visited a sports-related page or site in the recent past.
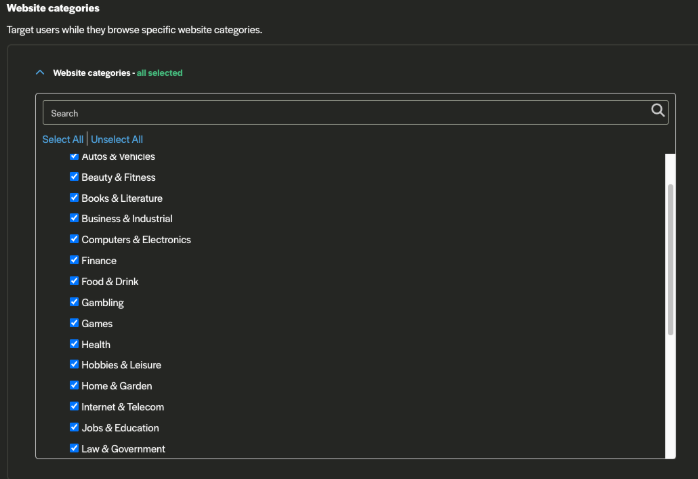
Website Category Targeting
This targeting parameter optimizes for traffic that is visiting a specific website from the category in real-time (i.e., at the present moment). So, for example, if you only select sports, the platform will show your ad to someone currently visiting a sports-related website.
Step 4: Device, Content, Connection Type
Next, you’ll be able to go a little more granular and target your new campaign according to Device, Content, and Connection.
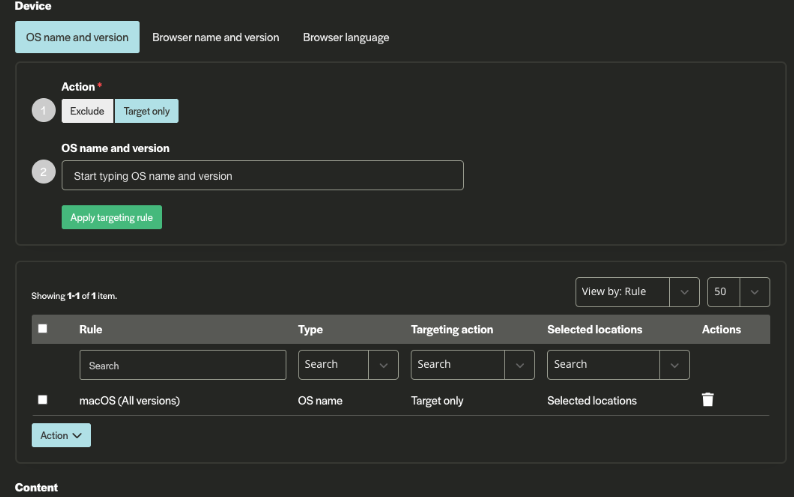
Device Targeting
In the example above, we’ve chosen to target Apple’s operating system, namely macOS. You have the option to target these devices only, known as “target only/whitelisting” (which we’ve done), or you can exclude them completely, known as “exclude/blacklisting.” You can do this by shifting between the two “Action” buttons
As you include/exclude your targeting parameters, they will reflect in the “Rule” drop-down list as an action item and will be stored until you choose to remove them or swap them out with different parameters. You can also set your targeting according to browser name and version (i.e., Safari), as well as browser language.
Content Targeting
Next, you can target your campaign according to key content parameters: domain, URL keywords, zone list, and traffic restrictions. The zone list is a crucial targeting component for optimizing your campaign at a later stage
The feature allows you to blacklist unprofitable zone IDs or whitelist profitable zone IDs. You’ll be able to see which zones are performing well through a third-party tracker and utilize them to the fullest to boost your ROAS. You’ll also be able to see which zones are not performing and keep them out of your campaign
Connection Type Targeting
Here, you can focus on users based on their internet connection, such as cellular or cable/DSL. This is especially useful for campaigns targeting specific mobile carriers or organizations.
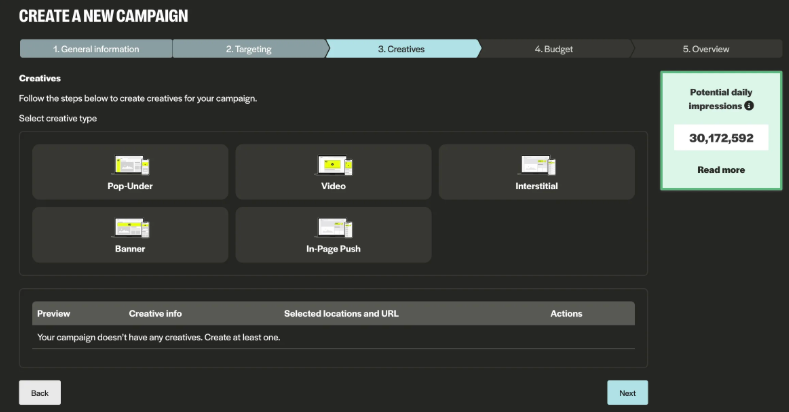
Step 5: Add Your Creatives & Select Your Ad Formats
Now it’s time to load up your campaign creatives and choose your ad formats. You’ll have five ad formats to choose from, which we’ll cover in more detail below. For this example, we’ve chosen to run Pop-Under, as it is also one of the most highly engaging and profitable ad formats out there. Something important to note is that Pop-Under only requires landing page creatives, whereas three of the other formats require both a landing page and an image/banner/text. Video requires content, and, if it’s a pre-roll ad, it also requires an in-site video player, as well as the usual landing page.
As you select one or more of the five formats on offer, you can load up your campaign creatives (or marketing materials) by copying your creative URL into the information box provided or dragging and dropping your creatives onto the platform
You’ll also see the available macros you can use to track and optimize your campaign through third-party trackers. This will allow the data coming from Adcash to cross over and be available in your third-party tracker/reporting tool. Find out more about campaign URL macros.
Please keep in mind to always “Save Creative” before moving on to the next step
How To Choose Your Ad Formats
Below you’ll find five leading ad formats available on the Adcash Advertiser platform. The categories include Full-Screen Ads (Pop-Under and Interstitial), Display Ads, In-Page Push, and Video (Pre-roll and Sliders).
Pop Under
Pop-under ads offer massive potential for increased awareness. The ad seamlessly integrates into the UX flow by appearing behind the browser window, staying behind the scenes until the user logs out of what they’re doing
Interstitial
Interstitial ads deliver high conversion rates for advertisers. Appearing in the time it takes for a website/page to load, Interstitials remain highly visible without being too intrusive. The ad also has a hard-coded 5-second countdown window that guarantees a delay in exit times
In-Page Push
These alert-like ads are the next generation of traditional push notifications. They’re well-targeted, highly engaging, and unobtrusive to a site’s UX.
Display Ads
These traditional display ads include three different layouts: skyscrapers, rectangles, and leaderboards. These ads are versatile and deliver high engagement. Nowadays, they are mostly used to increase brand awareness
Video
Pre-roll ads and slider ads both have dynamic, attention-grabbing video on their side. Say and show more of your brand than you ever could with static ads
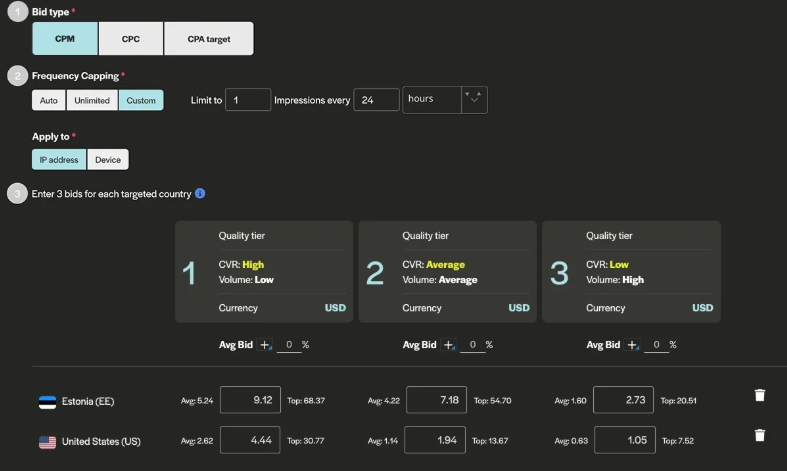
Step 6: Set Your Advertising Campaign Budget & Bids
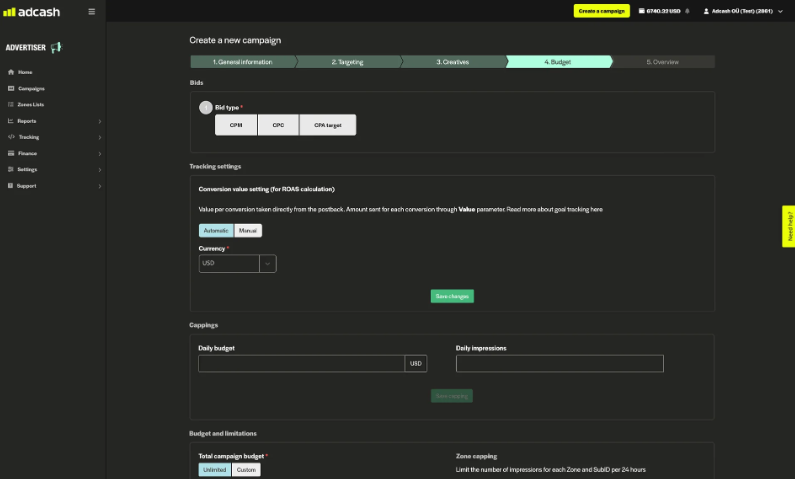
Bids Setting
Here, you can select your bid type, i.e., CPM, CPC, or CPA Target. Please keep in mind that CPC cannot be applied to the Pop-Under format
If you can place a tracking postback, we recommend trying CPA Target Bidding. This bid type automatically optimizes your campaign’s traffic and performance to maximize reach. Find out more about CPA Target Bid
In case you cannot use tracking and decide to pick the CPM bid type, we highly recommend using our Quality Tier Bidding function, where you can set 3 bids per country rather than just 1 bid. This will allow a more advanced bidding strategy. Read more about this dynamic pricing strategy here.
Tracking settings
If you’re running performance-based campaigns with CPA, CPS and CPA Target payouts, you need to have goal tracking implemented to track your campaigns’ performance. Here you can choose one of the two options below:
- Automatic (taken from conversion postback call)
- Manual (the user enters the amount per campaign to the selected goals)
To track your conversions, you must integrate a tracking code onto your website (landing page). More about it in the next step.
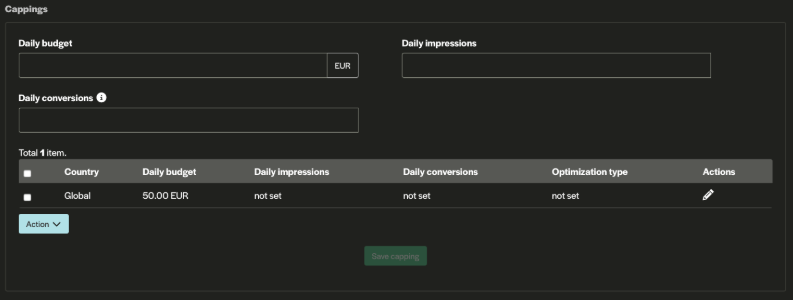
Cappings
When creating a campaign, you can set up different types of cappings. In the fields below the section you can find:
- Daily budget—This setting limits the amount spent on a campaign in one day. It can be applied either on a global or country level.
- Daily impressions—This setting limits the number of impressions received by a campaign in one day. It can be applied either on a global or country level
Budget and Limitations
It’s time to set your budget. Firstly, you’ll be able to set your campaign up according to the times of day you’d like it to run (weekly distribution). You can choose to have your campaign run at certain hours of the day or allow it to run 24/7, which most advertisers opt for.
You can also choose to customize and cap your total campaign budget. On the campaign level, you can set a total amount (i.e., $1000) whereby the campaign will draw to a halt once the amount has been spent. The second option is a daily budget (i.e., $250 daily) where you can apply the time frame for which you’d like your budget to be spent
Double-check your campaign settings in the final “overview” step and hit the “Create a Campaign” button! Our compliance team will review your campaign and notify you once the campaign has been approved.
Step 7: Set Up Tracking
Adcash allows you to track the performance of your campaigns for web and mobile web. There are two types of tracking methods that you can integrate to send information about different types of events:
- Global Postback URL (S2S)
- Hybrid HTML pixel
For more technical information on each method, learn more at Adcash’s Tracking 101
While our platform is not equipped with built-in ad-tracking technology, we prioritize delivering the best solutions for our clients. To ensure comprehensive campaign performance and optimization, we have a special deal with Voluum, a leader in ad-tracking and analytics. This collaboration allows us to offer industry-leading insights and data-driven strategies, combining our expertise with Voluum’s cutting-edge technology to provide our clients with unparalleled results. If you want to forget about painstaking manual adjustments, Adcash x Voluum Automizer integration will make it effortless – check out their guide how to integrate the automizer here.
Step 8: Campaign Optimization
The work doesn’t stop here! First, we test and then optimize to ensure a great performance. After you’ve put your campaign live, you need to give it some time to run before you start optimizing. The right time to optimize depends on your bid type, but the main thing to remember is the campaign needs to get some traffic first. And that relies heavily on your campaign’s budget
The performance tab is key to optimizing and scaling your Adcash advertising campaigns.
This insightful tab will help you maximize your campaign’s performance and, if used correctly, earn a higher ROAS! You’ll be able to see how many auctions your campaign participated in, the win rate (the percentage of auctions your campaign’s bid won and that, as a result, converted into actual ad impressions), and the ROAS for your campaign.
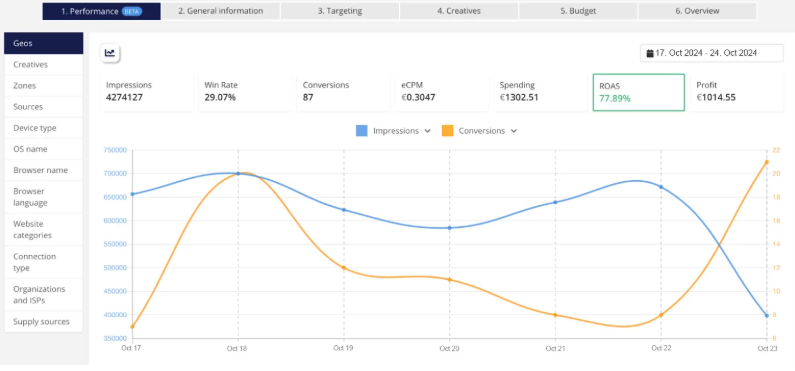
So, this is why it’s crucial to set up your tracking and use the conversion value setting. This information will allow our system to calculate your campaign’s ROAS and monitor your performance every time you get a conversion
That’s it for this step-by-step guide to using the Adcash Advertiser Platform. All the best on the journey ahead, and please feel free to reach out to us anytime for more tailored targeting tips and optimization tactics
And if you haven’t already, you can start your journey to profitability and register your new Adcash Advertiser Account below.
Stay tuned for more targeting/tracking tips, and good luck running the best online marketing campaigns!