Looking to maximize your website’s revenue? Adcash’s Publisher platform has evolved significantly in recent years. The platform now boasts a more intuitive user interface, a sleek, modern design, and enhanced reporting and analytics tools to help you track performance more effectively. Despite these upgrades, the platform remains as user-friendly as ever, making it easy to get started.
If you’re new to Adcash, this guide is for you. We’ll walk you through the essential steps of setting up your account, adding your website, verifying your domain, placing ad zones, and starting to earn revenue from your onsite conversions
Why Should I Monetize with Adcash?
Before signing up for an account, it’s important to understand what the Adcash Publisher platform offers in terms of website monetization, ad placement, and reporting features
Granted, you’re a website owner, content creator, ad network, or SSP, Adcash makes it easy to increase your revenue with just a few simple steps. The platform uses advanced optimization technology to maximize your traffic, ensuring that the most relevant ads are shown to your users.
Once you create your publisher account, you’ll gain access to top-tier features, real-time statistics, and comprehensive reporting tools, including the following:
High Fill Rate
You’ll be able to monetize more impressions with consistently high fill rates and eCPMs.
Worldwide Coverage
No matter where your website’s audience is, you’ll be able to monetize your onsite content across all devices and match your traffic with high-quality campaigns across 195 countries
Access to Engaging Ad Formats
Choose to manage ad formats manually, including video, pop-under, interstitial, in-page push, and display. You can also streamline your on-site presence with Autotag. It’s a 4-in-1 ad solution that rotates between pop-under, interstitial, in-page push, and video slider.
Anti-Adblock Technology
As a website owner, you’ll be able to show ads even if a user has an existing ad-block tool enabled. Sophisticated Anti-AdBlock technology can bypass most AdBlockers and increase your earnings in the process.
Live Statistics and reporting
You can check out real-time statistics in the Publisher Platform Statistics section. Also, track and monetize your earnings in real time and get statistics sent directly to your server via a built-in reporting API.
Fast Payments
You’ll have various fast and flexible payment methods, and you’ll decide when you’re getting paid.
Step 1: Create Your Account
Let’s dive right in and walk you through the steps to get set up as an Adcash Publisher. We’ll guide you through each process, from creating your account to adding your first website.
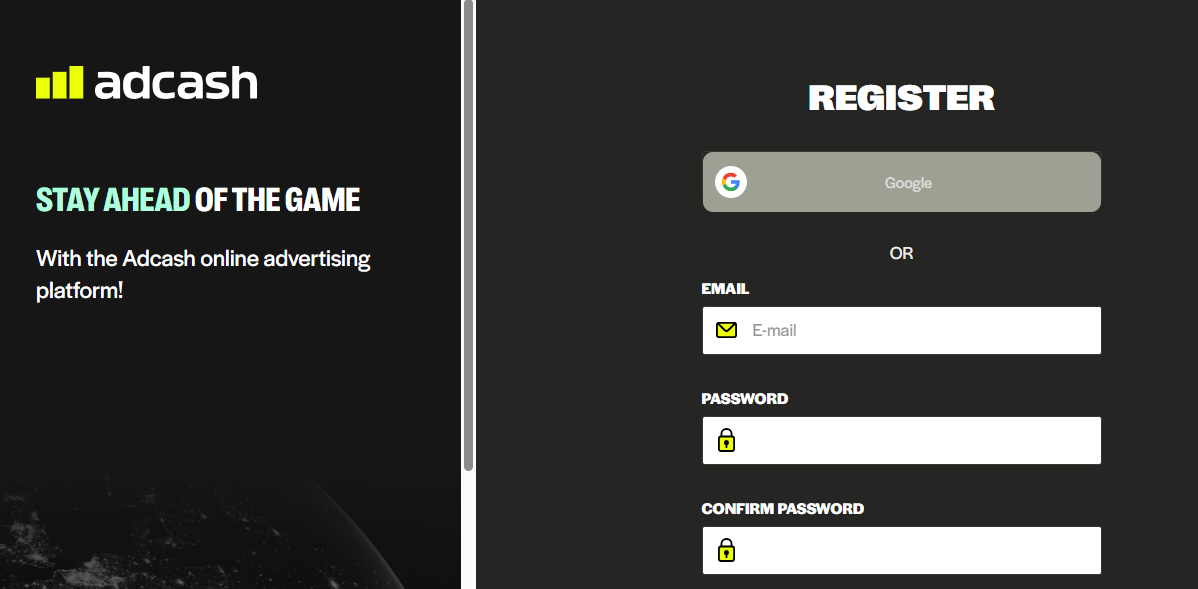
First, you need to register your account. Fill in your e-mail and create a password.
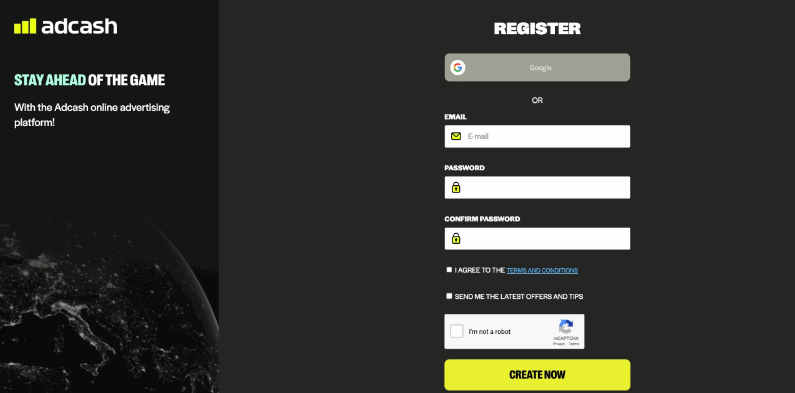
Then click the “Register” button to confirm.
Next, you’ll get an email with an Adcash account activation link
Click the link to verify your email address. You can contact customer support if the email does not arrive within an hour.
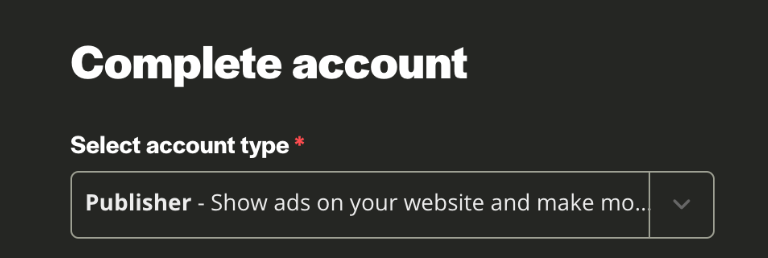
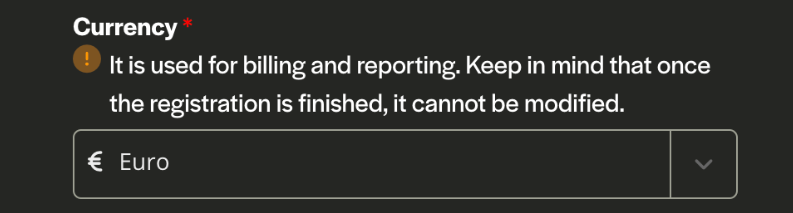
Then, you’ll need to complete your Adcash Publisher account on the platform. Select “Publisher” type from the dropdown menu, and after that, choose your currency type based on what is suitable for you.
Please keep in mind that once the registration is completed, the currency can not be modified.
Then click the “Register” button to confirm.
Step 2: Add Your Website

Once you have created an account and logged in, you should be able to see the “Add a website” page. Please enter the needed information to complete the first step:
- Your website’s URL
- Ownership (Owner, Arbitrage, or AdNetwork)
- Vertical or content category
Tick to allow adult advertising if needed.
Click Submit.
You may use the generated code to create an Autotag zone or explore other ad formats to select the method that is best suited for your website.

Remember that Adcash caters to almost all website traffic in all major languages. They do, however, withhold the right to prohibit certain types of websites. You can find out more about site approval regulations.
Once you submit your website, our compliance team will review it. If everything meets our guidelines, we’ll send you a confirmation email, and you can go ahead with your first payment
Step 3: Account Homepage
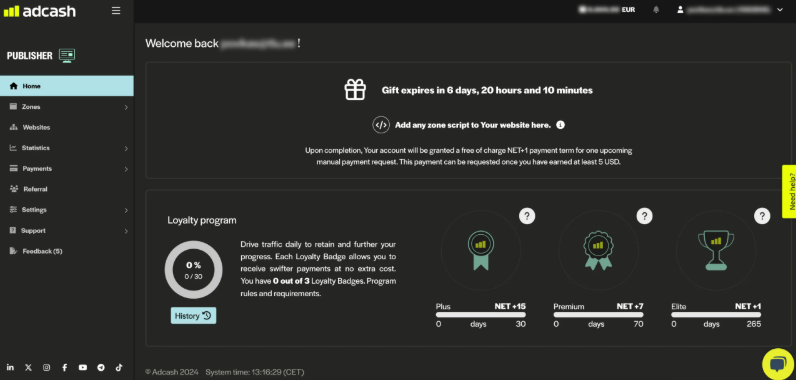
Welcome to your account homepage! Now that your Adcash Publisher platform account is fully registered, your website added, all that’s left to do is navigate through the platform, set your zones, and start placing ads on-site
The Adcash Publisher homepage is easy to work with and navigate around. You can head to the zones tab to create new ad units and configure your site placements for the best possible reach.
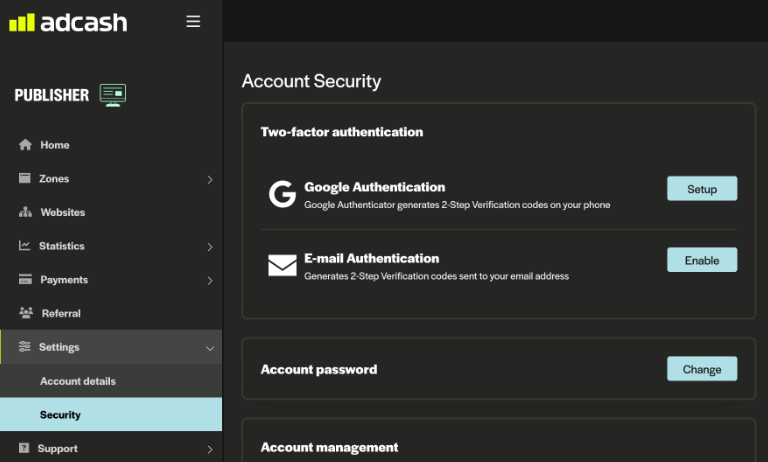
Enable 2FA
Remember to add an additional layer of security and password protection to your account by enabling 2FA. Find out more about the 2FA account setup.
Step 4a: Create New Zone
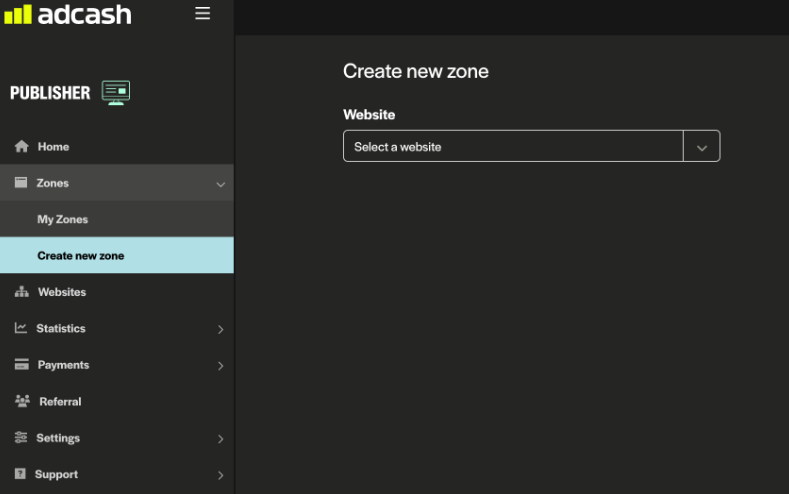
Now it’s time to get your ads to display on-site. Open the “Zones” tab on the Publisher Platform homepage. Select “Create New Zone”, select your website, and find the right ad format to complement your traffic best. From there, a snippet of JavaScript code will be generated that you can insert onto your website. Check out the code integration support pages for more information.
Monetize with Autotag
Here’s where things start to get interesting. You can either manually select your ad formats and place them onsite one by one or insert four formats simultaneously with a single line of code.

The Autotag feature is designed to think ahead of the competition. The tag consists of 4 top-converting ad formats: Pop-Under, In-Page Push, Interstitial, and Video Slider. All four ad formats are in a single easy-to-integrate tag, where you, as the publisher, take control of your monetization journey by delivering and rotating targeted ads based on your audience’s behavior.
Step 4b: Monetize Ad Formats Manually

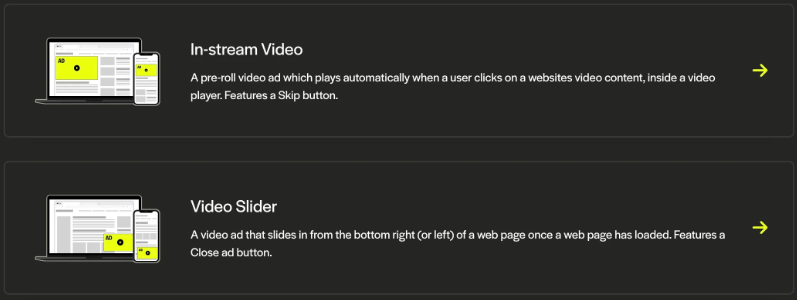
The second dropdown will direct you to five leading ad formats, each with its unique code snippet that you can copy/paste onto your website. The formats are split according to Full-Screen Ads (Pop-Under and Interstitial), Display Ads (In-Page Push and Banner Ads), and Video (Pre-Roll and Slider). Below you’ll find a brief description of each.
Video Ads – These come in two forms, so you can use them if you have an in-built video player or not: slider and pre-roll. Video immediately catches the eye, plus they’re more engaging, more persuasive, and more dynamic than still images.
Pop-Under – By appearing behind the browser window, these ads seamlessly integrate into the UX flow, staying behind the scenes until the user logs out of what they’re doing.

Interstitial – Appearing while the website/page loads, Interstitials remain highly visible without being too intrusive. The ad also has a hard-coded 5-second countdown window.

In-Page Push – These alert-like ads are the next generation of the traditional push notification. They’re well-targeted, highly engaging, and unobtrusive to a site’s UX.

Display Ads – These ads come in various banner shapes, including skyscrapers, rectangles, and leaderboards. They’re versatile and deliver maximum visibility and engagement.

Step 5: Autotag Behaviour/Setup
Autotag has a Monetization Goal where you can adjust the frequency and consistency of the ads displayed on-site. As a website owner, you can find the right balance between increased overall earnings and a quality end-user experience.
Website owners can choose between three different monetization approaches. One option focuses on maximizing earnings, which typically leads to more frequent ads, while another prioritizes maintaining an excellent user experience (UX), often resulting in fewer ads. The third approach strikes a balance, aiming for a middle ground between monetization and user experience. The key is to find the right balance that suits your traffic and goals.
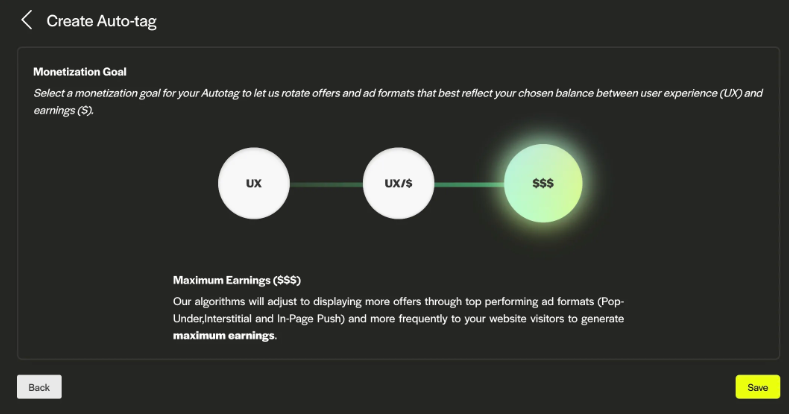
Better User Experience:
Fewer ads are displayed and less frequently. This will have less revenue potential but give your website visitors a much better user experience
Balanced User Experience/Earning Potential:
Ads will rotate in such a way as to protect your earnings on one hand while remaining less intrusive to site visitors on the other.
Maximum Earnings:
Where the algorithm adjusts to display more offers more frequently to monetize more traffic and generate maximum earning potential.
You can read more about the Autotag feature here
Step 6: Autotag Installation Instructions
Now all that’s left to do is copy the JavaScript tag from the Autotag display and insert it into the source code section of your site. Depending on your site and your unique requirements as a site owner, you can either choose to copy the Autotag code with or without the accompanying Anti-Adblock code.
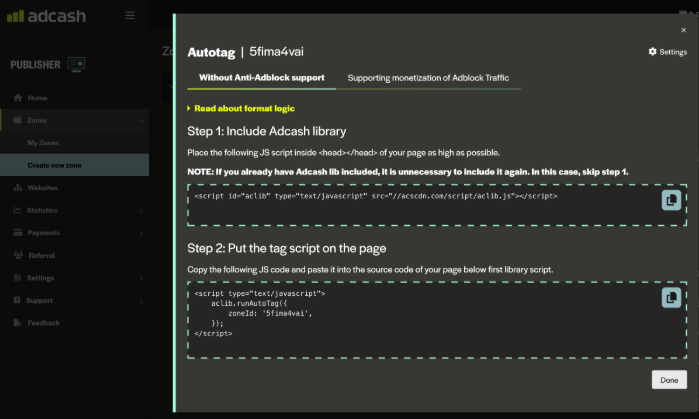
Check out this article for full Autotag installation instructions on WordPress, or browse through the website integration supporting page for further information and tailored steps to monetize more traffic. And remember to ensure you have full admin access to your website.
Step 7: Monetize & Monitor with Live Statistics
Finally, you can monitor live statistics directly from your Adcash Publisher Panel Reporting Tab once you’re fully set up. Here you’ll have the essential metrics to analyze and monetize your website. We suggest using this panel regularly to track your site’s performance and collect valuable insights for future ad placements.
Here, you will find the features below:
- Open or Close Chart View
- Date
- Grouping
- Sub-grouping
- Filter
- Download Report
- Additional metric values.
Moreover, you can filter your reporting according to the metrics below and more.
- Zone
- Country
- Date
- Week
- Month
- Device Type
You can learn more about the Publisher Statistics page here
Publisher Reporting API
The Publisher Reporting API will allow you, as a publisher, to get statistics sent directly to your server without needing to access the publisher panel. You’ll need to generate a token with your username and password to get started. Find out more about Publisher Reporting API.
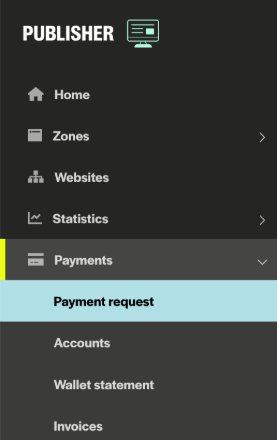
Step 8a: Request Payment
To request payment and withdraw your earnings, you must first submit a payment request. Payment requests begin at 5 USD/EUR, are different per payment method and processed according to the payment terms you select on the Payment Request page.
You can update your payment terms at any time, and the available options include
NET+30 days – The default payment term with no amount retained.
NET+15 days – 3% retained from the payment amount (minimum 3 USD/EUR).
NET+7 days – 5% retained from the payment amount (minimum 5 USD/EUR).
NET+1 day – 10% retained from the payment amount (minimum 10 USD/EUR).
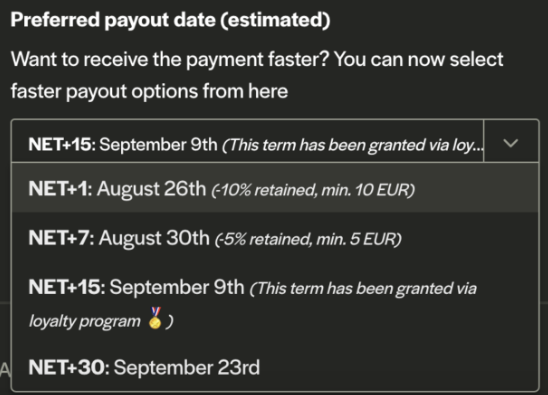
For example, if your balance is 1000 USD and you request a payment with the NET+1 day option, you will receive 900 USD (10% retained) on the next business da
The retained amount, which varies depending on the selected payment term, will be displayed in your payment request, invoice, and wallet statement. If you cancel a payment request, the full amount, including the retained portion, will be returned to your wallet. In cases of unsuccessful payments (e.g., refunded by the payment provider), the retained amount will also be refunded, though additional payment provider fees may apply.
If you prefer faster payments than the default NET+30 days, you can choose a non-default payment term, with the appropriate retention percentage deducted to cover the cost of expedited processing. Changes to payment terms only affect new requests and do not apply to already requested payments.
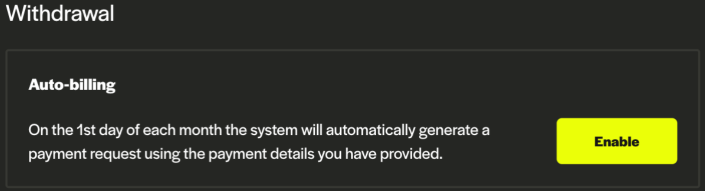
You can enable Auto-Billing to automatically generate a payment request based on your selected billing frequency. The payment request will be generated on the scheduled date according to the frequency you choose.
Available frequencies include:
- Monthly: A payment request is generated on the same date each month (e.g., the 1st of each month)
- Bi-Weekly: A payment request is generated every two weeks.
- Weekly: A payment request is generated once a week on your selected day.
- Daily: A payment request is generated every day.
For faster payments, you can select Daily under Auto-Billing to have payments processed promptly with a low withdrawal minimum.
For more details on the payment process and steps, please refer to the Payment Request Support page.
Start Monetizing
All the best on the road ahead, and as always, feel free to reach out to our all-star Publisher team or support center for tailored tips and placement suggestions to help you monetize more traffic.
And if you haven’t already, you can start your journey to profitability and register your new Adcash Publisher Account below.